Author Archives: András Majdán

About András Majdán

I'm an engineer, assistant lecturer and researcher at Budapest University of Technology and Economics.

Restoring factory firmware on Asus WL-500g Deluxe

If you have installed OpenWrt Backfire on your Asus WL-500g Deluxe and want to restore the factory firmware than this guide is for you.

Device: Asus WL-500g Deluxe
FCC ID: MSQWL500GD
CPU: Broadcom 5365
RAM: 32 MB
Flash: 4 MB
Network: 4 + 1 ports (10/100 Mb/s)
IP address: 192.168.1.1

Software on router before

OpenWrt Backfire
Version: 10.03.1 (r33081)

Software on router after

WL-500gD English Firmware
Version: 1.9.6.0

Host operation system is Fedora 19 (64 bit).
If you are not using Fedora 19, you should virtualize it:
Installing Fedora 19 (64 bit) in VirtualBox

I presume that you can communicate with your router.

Preparations

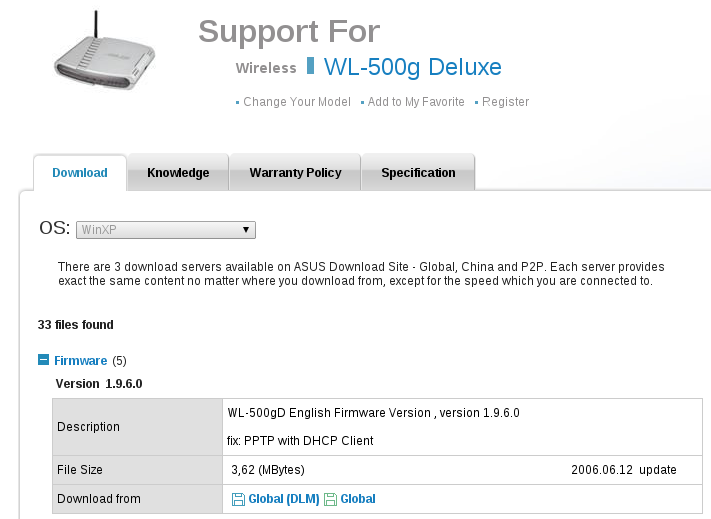
  1. Go to Asus Support site: http://support.asus.com/download/
    Type “wl-500g deluxe” in Model Name Search box
    Click Searchasus_support_search
  2. Click “WL-500g Deluxe
    found_wl500gd
  3. Select WinXP as OS
  4. Click Firmware
  5. Click “Global” in the Version 1.9.6.0 frame to download the firmware
    If it doesn’t work here is a copy of it one my site: WL500gx_1960_EN.zip
    router_page
  6. Decompress the firmware
    $ unzip WL500gx_1960_EN.zip
  7. Check firmware checksum
    $ sha1sum WL500gx_1.9.6.0_EN.trx

    It should return:
    a273a7e7c5278d4eb76c53c20492a772187ced59  WL500gx_1.9.6.0_EN.trx

Firmware update

  1. Copy this file in the router
    $ scp WL500gx_1.9.6.0_EN.trx root@192.168.1.1:/tmp/

    Note: My router IP address is 192.168.1.1, change it to your router IP address in all commands

  2. Login to your router
    $ ssh root@192.168.1.1

    Enter your password.

  3. Write the firmware to flash
    root@OpenWrt:~# mtd -r write /tmp/WL500gx_1.9.6.0_EN.trx linux

    mtd

  4. Wait until “Rebooting …” appears
    Note: If you have configured your router as an OpenFlow switch before using my guide than you have to pull out the LAN cable from WAN port now and plug into a LAN port (eg. LAN1).
  5. Go to http://192.168.1.1 in your browser
    user: admin
    password: admin

    Press Enter

    stock_firmware

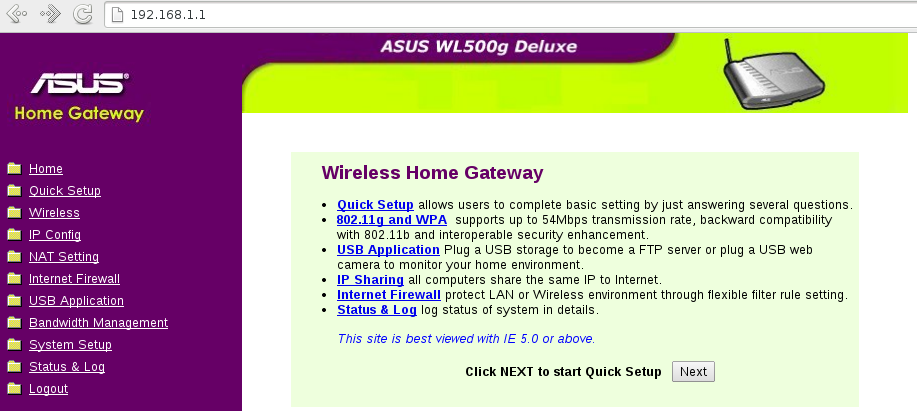
Congratulation! You have just restored the original firmware.

Installing Fedora 19 (64 bit) in VirtualBox

Requirements

64 bit x86 processor

  • at least 20 GB free space
  • at least 4 GB ram
  • Internet connection

Preparations

  1. Download and install Oracle VM VirtualBox from here:
    https://www.virtualbox.org/wiki/Downloads

    Binaries are under “VirtualBox platform packages” label
    I’ve used version 4.3.0 (but any later version should work too)
  2. Download Fedora 19 Desktop Edition (64 bit) from here:
    http://fedoraproject.org/get-fedora

    Actual link for me:
    http://download.fedoraproject.org/pub/fedora/linux/releases/19/Live/x86_64/Fedora-Live-Desktop-x86_64-19-1.iso

Installation

  1. Start Oracle VM VirtualBox
  2. Click New button
  3. Give some details about the virtual machine
    Name: Fedora 19
    Type: Linux
    Version: Fedora (64 bit)

    Click Next

  4. Set memory size to at least 1500 MB
    Click Next
  5. Select “Create a virtual hard drive now” option
    Click Create
  6. Select “VDI (VirtualBox Disk Image)” option
    Click Next
  7. Select “Dynamically allocated” option
    Click Next
  8. Set the size of the virtual hard drive to at least 16.00 GB
    Click Create
  9. Right click on “Fedora 19” machine -> Settings…
  10. Optional step
    If you have more than 1 CPU cores in your host machine:
    Select System → Processor
    Increase processor count for up to (your cores number – 1).
  11. Select Storage
    Click Empty (under Controller: IDE)
    Click on the disk icon in Attributes frame on the right
    Choose a virtual CD/DVD disk file…
    Select Fedora-Live-Desktop-x86_64-19-1.iso
    Click Open
    Click Controller: SATA
    Check Use Host I/O Cache
    Click OK
  12. Start the virtual machine by double clicking on “Fedora 19” label
  13. Dismiss the warning messages (click on x)
    Click somewhere inside the window
    If you get an information message here:
    Check “Do not show this message again
    Note: After clicking in the window the mouse cursor will be captured and all input goes to the virtual machine. If you want to leave the virtual machine press the Right Ctrl key. However from a point Fedora 19 supports mouse pointer integration where it is not necessary.
  14. Select “Start Fedora Live
    Press Enter
    (or simply wait for Fedora Live to autostart)
  15. In “Welcome to Fedora” window click “Install to Hard Drive
  16. Select English (United States)
    Click Continue
  17. Optional steps
    To change the time zone click “Change Date & Time
    Select the region and the city
    Click Done
    To change the keyboard layout click “Keyboard

    Click on the “+” sign and select your layout
    Click Add
    Change the order of layouts by clicking on your layout and the “^” sign

    Click Done
    Warning: This layout will only work on your installed system. That means that if you are entering a password in the installer it will be written according to the us layout.
  18. Click “Installation destination
    Click on “ATA VBOX HARDDISK” under Local Standard Disks
    Click Done
  19. Select “Automatically configure my Fedora installation to the disk(s) I selected and return me to the main menu.
    Click Continue
  20. Click “Begin Installation
  21. During installation you should set root password and create a user
    Click “ROOT PASSWORD
    Enter a Root Password and confirm it
    Click Done (or if you’ve given a weak password click it twice)
    Click “USER CREATION
    Check “Make this user administrator
    Enter user data
    Click Done (or if you’ve given a weak password click it twice)
  22. After installation has finished click Quit
  23. Click “Live System User
    Click “Power Off
    Click “Power Off
  24. Right click on “Fedora 19” machine → Settings
    Choose Storage
    Click on “Fedora-Live-Desktop-..” (under Controller: IDE)
    Click on the disk icon in Attributes frame on the right
    Remove disk from virtual drive
    Click OK

Update the system

  1. Start the virtual machine by double clicking on “Fedora 19” machine
    Dismiss the message about “Auto capture keyboard”.
    This is the boot menu, Fedora will start automatically.
    Note: If you press a key here you interrupt the boot of the default configuration. In this case choose the highest option (which is right in most cases) and press Enter.
  2. Click on your user or press Enter
    Enter your password
    Click “Sign In” or press Enter
  3. In Welcome screen choose English (United States)
    Click Next
  4. Select your keyboard layout
    Click Next
    Click Next
    Click “Start using GNOME 3
  5. Watch the sort tutorial(s)
  6. Update your system manually by doing the following:
    Click Activities
    Type “update” in the search box
    Click “Software Update
    Click “Install Updates
    Note:
    At this point you may encounter a kernel bug:
    WARNING: at net/sched/sch_generic.c:255 dev_watchdog+0x248/0x260()
    In this case continue the update process from a terminal:
    Click Activities
    Type “terminal” in the search box
    Click “Terminal

    $ sudo yum -y update

    Press Enter
    Enter your password

  7. If “A restart is required.” message pops up than click Close
  8. Close every window
  9. Click on the user’s name (in the upper right side of the screen)
    Click “Power Off
    Click “Restart
  10. Login as before
  11. Check updates as before
  12. All software is up to date” message should appear
    Note: If more updates are available than apply them

Install Guest Additions

  1. Open a terminal (by clicking Activities, typing “terminal” and press Enter)
  2. Install kernel development tools:
     $ sudo yum install kernel-devel gcc

    Enter your password
    Type “y” and Enter

  3. Install Guest Additions:
    Click Devices in VirtualBox menu
    Click Install Guest Additions…
  4. Click Run
  5. Type your password and click Authenticate
  6. After finish press Enter
  7. Set clipboard sharing between the host and the virtual machine
    Click Devices menu in the VirtualBox window
    Check Shared Clipboard → Bidirectional
  8. Power off the virtual machine:
    Click on the user’s name (in the upper right side of the screen)
    Click “Power Off
    Click “Power Off

Congratulation! You have just installed Fedora 19 in VirtualBox

Make a snapshot (optional)

  1. Make a snapshot of this state to be able to restore it later
    Click “Snapshots” in the Oracle VM VirtualBox Manager window
    Click the “Take Snapshot” button that looks like a camera
  2. Type “Original” as Snapshot Name
    Click OK
    Note: Now you can restore any time the original state by clicking on “Original” and the “Restore snapshot” button (a camera with an arrow)