Tag Archives: image

PBM P4 image file format

What is PBM P4?

PBM P4 is a hybrid monochrome file format, a mixture of ASCII and binary data.
It can be opened by several imaging software (eg. Gimp).

PBM P4 structure

Source of example.pbm :

P4
# CREATOR: bitmap2pbm Version 1.0.0
8 4 @0@0

The file starts with the ASCII section and ends with the binary section.

ASCII section

“P4” is the magic word which identifies the file format
The line starts with “#” is a comment (optional).
“8 4” is the dimension of the binary data
The ASCII section ends with exactly one whitespace after dimension

A character is a whitespace if isspace() returns true for it.
A comment line must end with CR of LF.
Any number of whitespaces could appear between the tokens.

Binary section

Contains the image data, where every bit corresponds to one pixel.
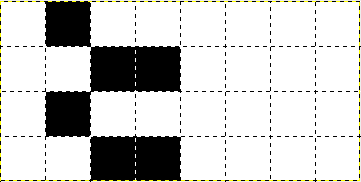
The example file consists of “@0@0” which is 4 bytes => 32 bits total.
Character code of “@” is 64, which is 01000000 in binary.
Character code of “0” is 48 which is 00110000 in binary.

“8 4” dimension means 4 lines of 8 bit binary data.
pbm8x4

“16 2” dimension means 2 lines of 16 bit binary data.
pbm16x2

BUT!

“5 4” dimension means 4 lines of 8 bit binary data, where only the most significant 5 bits are used.
pbm5x4

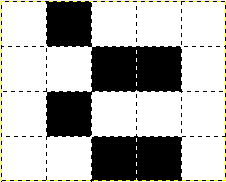
“15 2” dimension means 2 lines of 16 bit binary data, where only the most significant 15 bits are used.
pbm15x2

With lines there are no problems, they can be anything > 0.

Bitmap manipulation programs

bitmapdd

This program creates a bitmap from a file (or device). It’s mainly used for creating a usage map of input but it can also do conversions.

You can download bitmapdd from GitHub:

$ git clone https://github.com/andmaj/bitmapdd.git

Scenario 1:

You have a file which consists of blocks of data. If a block is full of zeros than it’s free, otherwise it’s used. You want to make a bitmap from it where a bit in the file is 0 if the corresponding block is zero, otherwise it’s 1.

For example with block size set to 4:

$ bitmapdd --bs 4 --if input.dat --of output.dat

bitmapdd1

Scenerio 2:

Converting a text of zeros and ones to a binary file where every bit corresponds to one character in the original file.

$ bitmapdd --bs 1 --null 48 --if usagemap.txt --of usagemap.dat

Note: null byte has been set to 48 which is the code of character “0” in the ASCII character table. 

usagemap.txt contains text:
001100000100000001000001

usagemap.dat will contain text:
0@A

Character Decimal code Binary code
0 48 00110000
@ 64 01000000
A 65 01000001

bitmap2pbm

Creates a P4 type PBM image from a binary file. With this program you can visualize your binary (for example a usage map).

You can download bitmap2pbm from GitHub:

$ git clone https://github.com/andmaj/bitmap2pbm.git

How to use

For example creating an image of the first 10000 bytes of memtest binary:

$ head -c 10000 /boot/memtest86+-4.20 | bitmap2pbm --of memtest.pbm

You can view the image in Gimp.

bitmap2pbm


fat2bitmap

Creates a bitmap from FAT file system free/used clusters. The bitmap is in text format so contains zero (character 48) and one (character 49) bytes.

A zero means that the cluster is free, a one means that the cluster is used.

You can download fat2bitmap from GitHub:

$ git clone https://github.com/andmaj/fat2bitmap.git

How to use

Create a usage map of FAT file system (from filesys.iso image file)

$ fat2bitmap --if filesys.iso --of usagemap.txt

Convert the result to a binary image map with bitmapdd:

$ bitmapdd --bs 1 --null 48 --if usagemap.txt --of usagemap.dat

And finally display the usage map:

$ bitmap2pbm --if usagemap.dat --of usagemap.pbm
$ gimp usagemap.pbm &

You can also do these steps with one command:

$ fat2bitmap --if filesys.iso | bitmapdd --bs 1 --null 48 | bitmap2pbm --of usagem
ap.pbm

Note:
To create a FAT file system image file follow my guide:
http://fejlesztek.hu/create-a-fat-file-system-image-on-linux/

Create a FAT file system image on Linux

How to create the image file

[UPDATE: 2018.12.11.]
I’m sorry for the late correction, the approval request of comments landed in the SPAM. Stefan Naumann and Wojciech Franczyk pointed out correctly:

“Hi. In the point 3 you are creating FAT filesystem on the disk image, but you should have it created only on the partition. This is corrupting the image. You can check it trying fdisk -l test.img after performing the point 3 – you will get no partitions.

To fix it we first need to map the partition to /dev:
sudo losetup –offset 1048576 -f test.img
offset value is the start sector of the partition [2048] multiplied by sector size [512] to get bytes.

And create FAT filesystem on the partition, not disk:
sudo mkfs.vfat /dev/loop0

I’m leaving the solution here because I had exactly this problem as I needed valid whole disk image (to boot it), not only the partition 🙂
Nice tutorial thought, thanks for that, It helped me. Cheers.”

  1. Create a file filled with zeros:
    $ dd if=/dev/zero of=test.img count=50 bs=1M

    This command makes a 50 MB image file. Change the “count” argument for different size.

  2. Create the partition (and partition table):
    $ fdisk test.img
    
    Command (m for help): o
    Building a new DOS disklabel with disk identifier 0x46ac6035.
    
    Command (m for help): n
    Partition type:
      p primary (0 primary, 0 extended, 4 free)
      e extended
    Select (default p): <Enter>
    Using default response p
    Partition number (1-4, default 1): <Enter>
    First sector (2048-99999, default 2048):
    Using default value 2048
    Last sector, +sectors or +size{K,M,G} (2048-99999, default 99999): <Enter>
    Using default value 99999
    Partition 1 of type Linux and of size 47.8 MiB is set
    
    Command (m for help): t
    Selected partition 1
    Hex code (type L to list all codes): c
    
    Changed type of partition 'Linux' to 'W95 FAT32 (LBA)'
    
    Command (m for help): w
    The partition table has been altered!
    
    Syncing disks
  3. Create the FAT file system in the image
    $ mkfs.vfat test.img 
    mkfs.fat 3.0.22 (2013-07-19)

 How to mount the image and copy files

  1. Create a directory for mounting
    $ sudo mkdir /mnt/test
  2. Mount the image
    $ sudo mount test.img /mnt/test

    Now you can copy/delete files in /mnt/test directory which will be written into the image file.

  3. After file operations unmount the image
    $ sudo umount /mnt/test
  4. Delete the directory
    $ sudo rmdir /mnt/test