Category Archives: Uncategorized

How do succinct data types work in libcds? – Part II

How does RRR work?

Basics

todo

Building the RRR structure

When you build an RRR structure you have to define the bitstring and a sample rate.

BitSequenceRRR::BitSequenceRRR(const BitString & bs, uint sample_rate);

bs is the source data
sample_rate is todo

BLOCK_SIZE := 15, by definition.
C_field_bits := 4, it means how many bits required to express BLOCK_SIZE

Note: I use these values from here without the variable names.

C_len := number of 4 bit blocks in source data
C := uint array with size enough to hold C_len * 4 bits

It makes a table_offset object named “E” with BLOCK_SIZE parameter:

table_offset::table_offset(uint u)

This call creates:

  • 2 simple arrays: short_bitmaps[2^(15+1)], offset_class[15+2];
  • 2 two dimensional arrays (with dimension (15+1)x(15+1)): binomial, log2binomial
  • 1 array (_List) with size 2^(15+1+1)

See how these tables look like: binomial table, log2binomial table, short_bitmaps, offset_class
You get the log2binomial table by ceiling the log2 values of the binomial table.
You get short_bitmaps array by iterating all possible numbers with the given number of 1s in it’s binary form.
offset_class array contains the offsets (in short_bitmaps) of the classes of ones.

libcds_rrr_offset_note

Note: short_bitmaps and offset_class tables was generated with BLOCK_SIZE set to 4 for readability.

I have no idea what is the purpose of _List after the creation of these tables (it’s saved as rev_offset). The algorithm for filling sort_bitmaps and offset_class arrays are REALLY complicated, contains deep recursion, names written in Spanish.. so I skip describing it’s inner working.

todo

It iterates through the source data and counts the number of ones in 15 bit groups (see BLOCK_SIZE). In the iteration it always sets the next 4 bits (see C_field_bits) of array “C” with this number.

todo

While iterating the total number of ones is summed and … todo

Getting the 15 bit parts and setting the 4 bit parts in uint arrays is done by using the uint arrays as packed arrays.

Note:
These are the functions for handling arrays as packed arrays (libcdsBasics.h):

inline uint get_var_field(const uint *A, const size_t ini, const size_t fin);
inline void set_field(uint *A, const size_t len, const size_t index, const uint x)

todo

Problems and inefficiencies in RRR

  • Zeroing is done one by one. A standard library call should be used instead!
  • generaClase function uses deep recursion which is inefficient
  • There are lots of +1s,+2s in array dimensions which are unnecessary
  • todo

How do succinct data types work in libcds?

About libcds

Libcds is a library which implements low-level succinct data structures to provide the building blocks of most compressed/succinct solutions. Libcds is written in C++.

There are 4 kind of succinct data structures in libcds which are based on bitmaps:

  • DArray
  • RG
  • RRR
  • SDArray

What is common in these structures?

Each structure can be built from a BitString. BitString is the data container of libcds which consists of the following:

size_t length;
size_t uintLength;
uint * data;

“length” is the count of bits (of the whole data).
“uintLength” is the count of uints at the memory where the “data” pointer points.
“data” is pointer to uints which hold the data.

size_t is at least 32 bit on 32 bit systems and at least 64 bit on 64 bit machines (because it’s the type of the size parameter of malloc). So you can hold a maximum of 64^2 bits in this structure on a 64 bit system.

How does RG work?

Basics

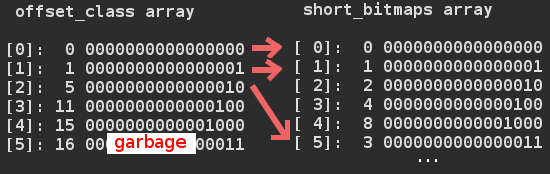
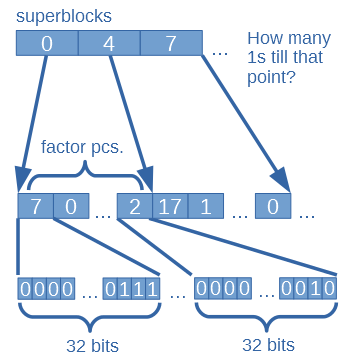
RG uses a superblock table where each element tells how many ones present till it’s corresponding data group. When you create this structure you have to define a factor which tells how many data blocks must be grouped together.

libcds-rg-basics

Building the RG structure

When you build an RG structure you have to define the bitstring and a factor.

BitSequenceRG::BitSequenceRG(const BitString & bs, uint _factor);

bs is the source data
_factor means that how many uints of bs will make a superblock

This class holds the following variables:

size_t n = bitcount of bs
size_t integers = number of uints in bs
size_t factor = _factor
size_t s = 32 * factor
uint *data;
uint *Rs;

s is the number of bits in a superblock.
Rs is the array of superblocks.

The constructor function creates an uint array named “data” with length “integers”. The uints from bs copied here. The remaining space is filled with zeros.

Then it builds the array of superblocks by calling “void BitSequenceRG::BuildRank()”.

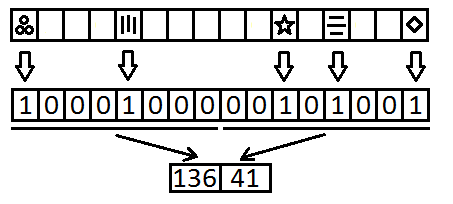
The superblock array (Rs) is filled up in this way:

  1. The first element is 0 because rank is obviously 0 before the first bit of data.
  2. The further elements are calculated as: the previous element + the number of ones in the previous block of “data” (with block size of “s” bits).

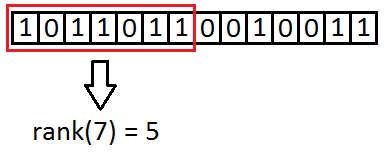
How does rank work on RG?

size_t BitSequenceRG::rank1(const size_t i1);

i1 is the index where we want the rank.

First it gets the element with index i1/s from the superblock array (Rs).
This will tell the number of ones till the block’s start (where the index maps).

libcds-rg-rank1

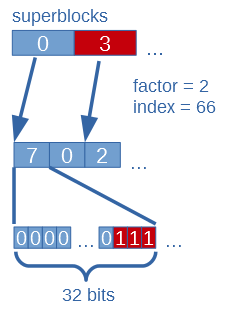
Second it iterates through all uints in data from block’s start to just before the uint comes where the index maps. It counts ones in these uints and sums them. The uint where the index maps has to be masked before it can count the ones in it (because the remaining part must be dismissed). Than number of ones in it are counted and summed with the previous result.

libcds-rg-rank2

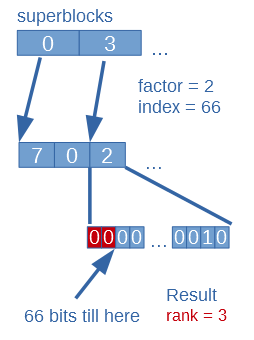
This result is the rank.

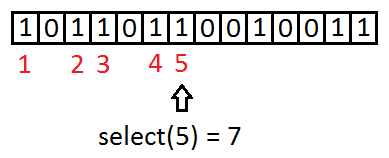
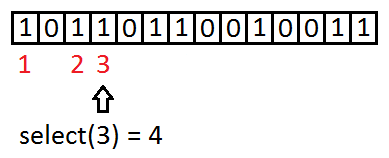
How does select work on RG?

size_t BitSequenceRG::select1(const size_t x1);

We are looking for the index of the x1-th one in data.
x1 parameter is stored as x variable in this function.

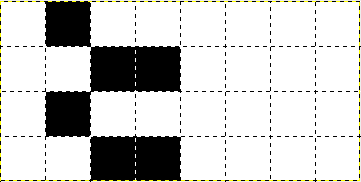
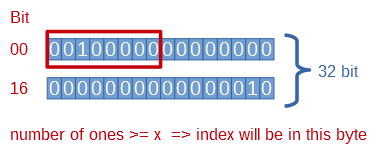
First it does a binary search in the superblocks array (Rg) until it finds the greatest element which is less than x. This means that where this superblock maps (start of uint block in “data”) there are fewer ones than x.

libcds-rg-select1

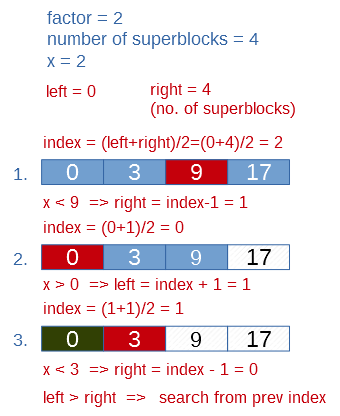
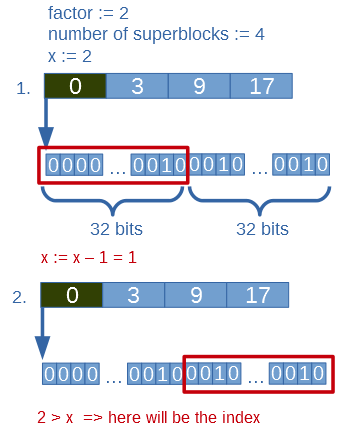
Second it subtracts the found superblock element from x. So x will equal to the remaining ones which need to be counted from this block.

( in the example the found element is 0, so  x won’t change )

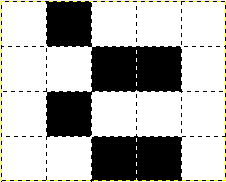
Third it iterates the uints from this block and subtracts the number of ones in them from x. This goes until a block which has more ones than the current x. It means that the select result will be in this uint block. This block’s value is saved and future work is done on it.

libcds-rg-select3

Fourth it iterating through 8 bit parts of this uint (by shifting and substracing number of ones of these parts) until a 8 bit part has more or equal ones than the current x.

libcds-rg-select4

Fifth it iterates through this 8 bit part (bit by bit) by shifting and subtracts the current bit value by masking from x.

It returns the bit index where the last one has been found.

Note:
RG uses popcount and popcount8 function where it counts the number of ones in a 8/32 bit variable. These functions use array “const unsigned char __popcount_tab[]”, which is a lookup table with 256 elements.

For a 8 bit value it gets the number of ones in step (be using the value as the index of the table). So this table contains the number of ones of every possible 8 bit value.

For a 32 bit value it gets the number of ones by making 4 x 8 bits from it (by masking) and summing their value in the lookup table.

Time and space requirement

n – data length in bits
factor – how many blocks to group together (for superblocks)

Building the structure:
time(n, factor) = O(n)
space(n, factor) = O(n/factor)*

* It’s O(n) in the current implementation because it makes a copy of the original data, but it can be easily fixed.

Rank:
time(n, factor) = O(factor)

Select:
time(n, factor) = O(log(n/factor)) + O(factor)

Problems and inefficiencies in RG

  • Every array elements are copied one by one. Zeroing is also done one by one. A standard library call should be used instead!
  • There are two elements which have the same meaning: constant “W” in cds-utils namespace and “b” a class variable in BitSequenceRG. They are set to 32 (the bit-length of uint). It is a bad practice to use two variables for the same purpose (maybe you forget to change both). In my notes I changed them to constant 32.
  • uint is used everywhere in the code. Because uint is not a standard C++ data type the code will not work consistently (or at all) across different platforms. On my 64 bit machine with Linux and GCC 4.8.2/Clang 3.3 uint is defined as unsigned int and it is a 32 bit data type.
  • On 64 bit platforms a 64 bit storage type (like uint64_t) should be used for performance
  • popcount functions are great however on modern processors it could be optimized to one opcode by using assembly.

Go to How do succinct data types work in libcds? – Part II

Access, rank and select queries on bitmaps

What is access?

Access tells you the value at a given index in a bitmap.

Example 1

bitmap_ex1

Example 2

bitmap_ex2

In programming sense it is a function with 2 arguments:

int access(void *bitmap, int index)
{
 // ...
 return value;
}

What is rank?

Rank tells you how many 1s are in a bitmap till a given index.

Example 1

bitmap_ex1_1

Example 2

bitmap_ex1_2

In programming sense it is a function with 2 arguments:

int rank(void *bitmap, int index)
{
 // ...
 return numofones;
}

What is select?

Select tells you at which index is the n-th 1 in a bitmap.

Example 1

bitmap_select_1

Example 2

bitmap_select_2

In programming sense it is a function with 2 arguments:

int select(void *bitmap, int numofones)
{
 // ...
 return index;
}

What is the use of these queries?

They are used in implementations of succinct data structures. With these structures data can be compressed in a way to be able to use in-place, without decompressing it first. By using these queries on these structures you can solve a lot of problems.

In these examples bitmap should be compressed of course by using a succinct data structure (like RRR) for size and an efficient rank/select implementation.

Example 1

You have a text which consists of words.

  1. You want to get the nth word of this text.
  2. You want to know how many words are in a range.

How can you accomplish this?

Make a bitmap which maps the words’ start position.
In this bitmap:
– 1 means a word’s start
– 0 means other

bitmap_text_words

With select you can solve the first problem:

index = select(bitmap, n);

Now you can read the nth word from this index.

With rank you can determine the words number in a range (a,b):

numofwords = rank(bitmap, b) - rank(bitmap, a);

Notice:
There should be a check here for the last word’s end (it can be out of range).

Example 2

There is a long line of containers at customs authority. Some are empty, others are filled with goods.

There are not enough officiers to check for all the containers (verifing if it contains what is written on it).
Check every nth occupied container!

You have a bitmap which maps containers.
In this bitmap:
– 1 means a container is filled with goods
– 0 means a container is empty

bitmap_containers

With select you can solve this problem:

index1 = select(n);
index2 = select(2*n);
// ..

Example 3

There is a large prison with lot of cells. A cell is empty or occupied by one prisoner. The cells are indexed in lines. The security system failed on one passage and all cells on this line accidentally opened.

How many prisoners did escape?

You have a bitmap which maps cells.
In this bitmap:
– 1 means a cell is occupied by a prisoner
– 0 means a cell is empty

With rank you can solve the problem:

number = rank(index_end) - rank(index_start);

PBM P4 image file format

What is PBM P4?

PBM P4 is a hybrid monochrome file format, a mixture of ASCII and binary data.
It can be opened by several imaging software (eg. Gimp).

PBM P4 structure

Source of example.pbm :

P4
# CREATOR: bitmap2pbm Version 1.0.0
8 4 @0@0

The file starts with the ASCII section and ends with the binary section.

ASCII section

“P4” is the magic word which identifies the file format
The line starts with “#” is a comment (optional).
“8 4” is the dimension of the binary data
The ASCII section ends with exactly one whitespace after dimension

A character is a whitespace if isspace() returns true for it.
A comment line must end with CR of LF.
Any number of whitespaces could appear between the tokens.

Binary section

Contains the image data, where every bit corresponds to one pixel.
The example file consists of “@0@0” which is 4 bytes => 32 bits total.
Character code of “@” is 64, which is 01000000 in binary.
Character code of “0” is 48 which is 00110000 in binary.

“8 4” dimension means 4 lines of 8 bit binary data.
pbm8x4

“16 2” dimension means 2 lines of 16 bit binary data.
pbm16x2

BUT!

“5 4” dimension means 4 lines of 8 bit binary data, where only the most significant 5 bits are used.
pbm5x4

“15 2” dimension means 2 lines of 16 bit binary data, where only the most significant 15 bits are used.
pbm15x2

With lines there are no problems, they can be anything > 0.

Converting Asus WL-500g Deluxe and TP-Link TL-WR1043ND to OpenFlow switches (Part 3)

Uploading and setting up the firmware on TP-Link TL-WR1043ND router

  1. Connect your PC’s Ethernet adapter to TP-Link TL-WR1043ND router’s LAN port
    Note: The adapter configuration must remain the same as in Asus WL-500g Deluxe setup.
  2. Open http://192.168.1.1 in your browser
    Type your username and password!
    (default admin/admin)
    Click System Tools
    Click Firmware Upgrade
    Click Browse…
    Select “openwrt-ar71xx-tl-wr1043nd-v1-squashfs-factory.bin” file and click Open
    Click Upgrade
    Click OK for question about the upgrade
  3. Wait until the progress bar finish
  4. From a terminal login to the router:
    $ telnet 192.168.1.1
    You should get:
    Connected to 192.168.1.1.
    Escape character is '^]'.
    === IMPORTANT ============================
    Use 'passwd' to set your login password
    this will disable telnet and enable SSH
    ------------------------------------------
    BusyBox v1.15.3 (2013-11-16 00:12:17 CET) built-in shell (ash)
    Enter 'help' for a list of built-in commands.
     _______                     ________        __
    |       |.-----.-----.-----.|  |  |  |.----.|  |_
    |   -   ||  _  |  -__|     ||  |  |  ||   _||   _|
    |_______||   __|_____|__|__||________||__|  |____|
    |__| W I R E L E S S   F R E E D O M
    ---------------------------------------------------
    Backfire (10.03.x Snapshot, r33081)
    ---------------------------------------------------
    * 1/3 shot Kahlua    In a shot glass, layer Kahlua
    * 1/3 shot Bailey's  on the bottom, then Bailey's,
    * 1/3 shot Vodka     then Vodka.
    ---------------------------------------------------
    root@OpenWrt:/#
  5. Change the routers IP address (just for running config):
    root@OpenWrt:/# ifconfig br-lan 192.168.1.2

    Close telnet (Ctrl + C, or by closing the terminal)

  6. Login to your router
    $ telnet 192.168.1.2
  7. Change your password:
    root@OpenWrt:/# passwd

    Enter your new password 2 times.

  8. Reconnect to the router using SSH
    root@OpenWrt:/# exit
    $ ssh root@192.168.1.2

    Type “yes” for the question about the RSA key and press Enter
    Give your password and press Enter

  9. Change switch identifier in openflow configuration:
    root@OpenWrt:/# nano /etc/config/openflow
    Change line

    option 'dpid' '000000000001'

    to

    option 'dpid' '000000000002'

    Press Ctrl+O, Enter than Ctrl+X to exit

  10. Change the network configuration
    • You can this by hand:
      root@OpenWrt:/# nano /etc/config/network
      Correct configuration:

      config 'switch'
      	option 'name' 'rtl8366rb'
      	option 'reset' '1'
      	option 'enable_vlan' '1'
      	option 'enable_learning' '0'
      config 'switch_vlan'
      	option 'device' 'rtl8366rb'
      	option 'vlan' '1'
      	option 'ports' '1 5t'
      config 'switch_vlan'
      	option 'device' 'rtl8366rb'
      	option 'vlan' '2'
      	option 'ports' '2 5t'
      config 'switch_vlan'
      	option 'device' 'rtl8366rb'
      	option 'vlan' '3'
      	option 'ports' '3 5t'
      config 'switch_vlan'
      	option 'device' 'rtl8366rb'
      	option 'vlan' '4'
      	option 'ports' '4 5t'
      config 'switch_vlan'
      	option 'device' 'rtl8366rb'
      	option 'vlan' '5'
      	option 'ports' '0 5t'
      config 'interface' 'loopback'
      	option 'ifname' 'lo'
      	option 'proto'  'static'
      	option 'ipaddr' '127.0.0.1'
      	option 'netmask' '255.0.0.0'
      config 'interface'
      	option 'ifname' 'eth0.1'
      	option 'proto' 'static'
      config 'interface'
      	option 'ifname' 'eth0.2'
      	option 'proto' 'static'
      config 'interface'
      	option 'ifname' 'eth0.3'
      	option 'proto' 'static'
      config 'interface'
      	option 'ifname' 'eth0.4'
      	option 'proto' 'static'
      config 'interface'
      	option 'ifname' 'eth0.5'
      	option 'proto' 'static'
      	option 'ipaddr' '192.168.1.2'
      	option 'netmask' '255.255.255.0'

      Press Ctrl+O, Enter than Ctrl+X to exit

    • You can do this with scp:
      Download this file with your browser: network-tplink

       $ scp network-tplink root@192.168.1.2:/etc/config/network

      Enter the router’s password

  11. Reboot the router
    root@OpenWrt:/# reboot
  12. Connect your PC’s Ethernet adapter to TP-Link TL-WR1043ND router’s WAN port
    (this is the configuration port, and the out-of-band communication port for OpenFlow)

That’s all! From now you can install an OpenFlow controller (eg. POX). The default controller address is 192.168.1.10:6633 (which can be set in /etc/config/openflow file).

If you want to restore the factory firmware:
Restoring factory firmware on TP-Link TL-WR1043ND

Jump to previous: Converting Asus WL-500g Deluxe and TP-Link TL-WR1043ND to OpenFlow switches (Part 2)

Converting Asus WL-500g Deluxe and TP-Link TL-WR1043ND to OpenFlow switches (Part 2)

Uploading and setting up the firmware on Asus WL-500g Deluxe router

Note:
OpenWrt wiki is wrong. You cannot upload the firmware through Asus WL-500g Deluxe web interface (aka OEM easy installation).

  1. Connect your PC’s Ethernet adapter to Asus WL-500g Deluxe router’s LAN port
  2. Set your network configuration to:
    IP address: 192.168.1.10
    Netmask: 255.255.255.0

    Note 1:
    If you want to make it in VirtualBox than you also have to set bridged networking by:

    1. Click Settings
    2. Click Network
    3. Select “Adapter 1” tab
    4. Set “Attached to:” to “Bridged Adapter”
    5. Set “Promiscuous Mode:” to “Allow All”
    6. Click OK

    Note 2:
    In Fedora 19, you can do this by:

    1. Click the network icon (top right corner)
    2. Click Network Settings
    3. Select Wired
    4. Click the setup icon (bottom right corner)
    5. Select IPv4
    6. Set Addresses to Manual
    7. Set Address to 192.168.1.10
    8. Set Netmask to 255.255.255.0
    9. Set Gateway to 192.168.1.1 (this is only required because of a Fedora 19 bug)
    10. Click Apply
    11. Set the “On” switch to “Off”
    12. Set the “Off” switch to “On”
    13. Close the windows
  3. Install a tftp client if you don’t have one
    $ sudo yum -y install tftp
  4. Disconnect the router from power
  5. Press and hold the reset button (at it’s back)
  6. Power up the Asus WL-500g Deluxe router (still holding the reset button)
  7. After the four LAN leds turn dark you can release the reset button
  8. The power led should start flashing slowly (if not try again from the disconnect part)
  9. From a terminal:
    $ tftp
    tftp> binary
    tftp> trace
    tftp> put openwrt-brcm47xx-squashfs.trx
    Wait until it finish
    tftp> quit
  10. Wait at least 2 minutes (for safety)
  11. Toggle the power
  12. Install a telnet client if you don’t have one
    Note: Yes it’s a shame, but Linux distributions are weird today.

    $ sudo yum -y install telnet
  13. Login to the router
    $ telnet 192.168.1.1
    You should get:

    Connected to 192.168.1.1.
    Escape character is '^]'.
    === IMPORTANT ============================
    Use 'passwd' to set your login password
    this will disable telnet and enable SSH
    ------------------------------------------
    BusyBox v1.15.3 (2013-11-16 00:12:17 CET) built-in shell (ash)
    Enter 'help' for a list of built-in commands.
    _______                     ________        __
    |       |.-----.-----.-----.|  |  |  |.----.|  |_
    |   -   ||  _  |  -__|     ||  |  |  ||   _||   _|
    |_______||   __|_____|__|__||________||__|  |____|
    |__| W I R E L E S S   F R E E D O M
    ---------------------------------------------------
    Backfire (10.03.x Snapshot, r33081)
    ---------------------------------------------------
    * 1/3 shot Kahlua    In a shot glass, layer Kahlua
    * 1/3 shot Bailey's  on the bottom, then Bailey's,
    * 1/3 shot Vodka     then Vodka.
    ---------------------------------------------------
    root@OpenWrt:/#
  14. Setup the router’s password
    root@OpenWrt:/# passwd

    Enter your new password 2 times.

  15. Reconnect to the router using SSH
    root@OpenWrt:/# exit
    $ ssh root@192.168.1.1

    Type “yes” for the question about the RSA key and press Enter
    Give your password and press Enter

  16. Change the network configuration
    • You can this by hand:
      root@OpenWrt:/# nano /etc/config/network

      Note:
      You may get here “Error opening terminal: xterm-256color.”
      It’s a Fedora 19 bug, type:
      root@OpenWrt:/# export TERM=xterm-color
      Correct configuration:

      #### VLAN configuration
      config switch eth0
      	option enable   1
      
      config switch_vlan eth0_0
      	option device   "eth0"
      	option vlan     0
      	option ports    "0 5"
      
      config switch_vlan eth0_1
      	option device   "eth0"
      	option vlan     1
      	option ports    "4 5"
      
      config switch_vlan eth0_2
      	option device   "eth0"
      	option vlan     2
      	option ports    "3 5"
      
      config switch_vlan eth0_3
      	option device   "eth0"
      	option vlan     3
      	option ports    "2 5"
      
      config switch_vlan eth0_4
      	option device   "eth0"
      	option vlan     4
      	option ports    "1 5"
      
      #### Loopback configuration
      config interface loopback
      	option ifname    "lo"
      	option proto    static
      	option ipaddr    127.0.0.1
      	option netmask    255.0.0.0
      
      #### LAN configuration
      config interface lan
      	option type     bridge
      	option ifname    "eth0.0"
      	option proto    static
      	option ipaddr    192.168.1.1
      	option netmask    255.255.255.0
      
      config interface
      	option ifname    "eth0.1"
      	option proto    static
      
      config interface
      	option ifname    "eth0.2"
      	option proto    static
      
      config interface
      	option ifname    "eth0.3"
      	option proto    static
      
      config interface
      	option ifname    "eth0.4"
      	option proto    static

      Press Ctrl+O, Enter than Ctrl+X to exit

    • You can do this with scp:
      Download this file with your browser: network-asus

      $ scp network-asus root@192.168.1.1:/etc/config/network

      Enter the router’s password

  17. Reboot the router
    root@OpenWrt:/# reboot
  18. Connect your PC’s Ethernet adapter to Asus WL-500g Deluxe router’s WAN port
    (this is the configuration port, and the out-of-band communication port for OpenFlow)

That’s all! From now you can install an OpenFlow controller (eg. POX). The default controller address is 192.168.1.10:6633 (which can be set in /etc/config/openflow file).

If you want to restore the factory firmware:
Restoring factory firmware on Asus WL-500g Deluxe

Jump to next: Converting Asus WL-500g Deluxe and TP-Link TL-WR1043ND to OpenFlow switches (Part 3)
Jump to previous: Converting Asus WL-500g Deluxe and TP-Link TL-WR1043ND to OpenFlow switches (Part 1)

Converting Asus WL-500g Deluxe and TP-Link TL-WR1043ND to OpenFlow switches (Part 1)

In this guide I will install OpenWrt Backfire on these routers with OpenFlow package.

WARNING: you may brick your router if version is > 1.7!
See Version/Model table

Device: TP-Link TL-WR1043ND Ver: 1.6
FCC ID: TE7WR1043NX
CPU: Atheros AR9132
RAM: 32 MB
Flash: 8 MB
Network: 4 + 1 ports (10/100/1000 Mb/s)
IP address before: 192.168.1.1
IP address after: 192.168.1.2
Software before: TL-WR1043ND_v1_130428
Version: 3.13.13 Build 130428 Rel.58290n

Software after: OpenWrt Backfire
Version: 10.03.1 (r33081)

OpenFlow
Stanford reference implementation
Version: 1.0
Device: Asus WL-500g Deluxe
FCC ID: MSQWL500GD
CPU: Broadcom 5365
RAM: 32 MB
Flash: 4 MB
Network: 4 + 1 ports (10/100 Mb/s)
IP address: 192.168.1.1
Software before: WL-500gD English Firmware
Version: 1.9.6.0
Software after: OpenWrt Backfire
Version: 10.03.1 (r33081)
OpenFlow

Stanford reference implementation
Version: 1.0

Build system:
Fedora 19 (64 bit)

If you are not using Fedora 19, you should virtualize it:
Installing Fedora 19 (64 bit) in VirtualBox

Building OpenWrt with OpenFlow package

  1. Open a terminal (by clicking Activities, typing “terminal” and press Enter)
  2. Update Fedora
    $ sudo yum -y update

    Enter your password
    Press Enter

  3. Install the packages that necessary to build OpenWrt
     $ sudo yum -y install git subversion binutils bzip2 gcc gcc-c++ gawk gettext flex ncurses-devel zlib-devel make patch unzip perl-ExtUtils-MakeMaker glibc glibc-devel glibc-static quilt sed sdcc intltool sharutils bison wget

    Note: All packages are necessary but some of them may has been already installed. And I am not wrong, you need subversion package because scripts use it.
    Enter your password
    Press Enter

  4. Download OpenWrt Backfire source from the OpenWrt Git repository:
    $ git clone git://git.openwrt.org/10.03/openwrt.git
  5. Get in the downloaded directory
    $ cd openwrt
  6. Update and install feeds
    $ ./scripts/feeds update -a
    $ ./scripts/feeds install -a
  7. Get out from openwrt directory
    $ cd ..
  8. Download the Stanford reference implementation of OpenFlow 1.0
    $ git clone git://gitosis.stanford.edu/openflow-openwrt

    If it doesn’t work here is a copy of it one my site: openflow-openwrt.tar.gz
    In this case you must extract it: $ tar -zxvf openflow-openwrt.tar.gz

  9. Get in the downloaded directory
    $ cd openflow-openwrt
  10. Move to the Broadcom branch
    $ git checkout -b openflow-1.0/brcm origin/openflow-1.0/brcm
  11. Link OpenFlow extension and configuration files in the OpenWrt directory
    $ cd ~/openwrt/package
    $ ln -s ~/openflow-openwrt/openflow-1.0/
    $ cd ..
    $ ln -s ~/openflow-openwrt/openflow-1.0/files
  12. Configure the build
    $ make menuconfig

    Select “Target System (…) —>”
    Select “Broadcom BCM947xx/953xx”
    Select “Target Profile (…) —>”
    Select “No WiFi”
    Select “Network —>”
    Check “openflow” package (to built-in <*>)
    Check “tc” package (to built-in <*>)
    Exit
    Select “Kernel modules —>”
    Select “Network Support —>”
    Check “kmod-tun” package (to built-in <*>)
    Exit
    Exit
    Select “Utilites —>”
    Select “Editors —>”
    Check “nano” package (to built-in <*>)
    Exit
    Exit
    Exit
    A dialog asks you here “Do you wish to save your new OpenWrt configuration?”
    Select Yes and Press Enter

  13. Make the toolchain for the target
    $ make tools/install toolchain/install
  14. Configure the Linux kernel
    $ make kernel_menuconfig

    Select Networking Support
    Select Networking options
    Select QoS and/or fair queueing
    Check Hierarchical Token Bucket (HTB) (to built-in <*>)
    Exit
    Exit
    Exit
    Exit
    Select Yes and Press Enter

  15. Build the OpenWrt image
    $ make
  16. Get out from openwrt directory
    $ cd ..
  17. Copy the created general firmware to here
    $ cp openwrt/bin/brcm47xx/openwrt-brcm47xx-squashfs.trx .

    This will be the firmware for Asus WL-500g Deluxe.

  18. Enter to openwrt directory again
    $ cd openwrt
  19. Clean everything
    $ make clean tools/clean toolchain/clean

    Note: a toolchain/clean should be enough here (but I don’t want to meet OpenWrt bugs)

  20. Get out from openwrt directory
    $ cd ..
  21. Get in the openflow directory
    $ cd openflow-openwrt
  22. Move to the TP-Link branch
    $ git checkout -b openflow-1.0/tplink origin/openflow-1.0/tplink
  23. Get to the openwrt directory
    $ cd ~/openwrt
  24. Configure the build
    $ make menuconfig

    Select “Reset to defaults”
    Select “Target System (…) —>”
    Select “Atheros AR71xx/AR7240/AR913x”
    Select “Target Profile (…) —>”
    Select “TP-LINK TL-WR1043ND v1”
    Note: From Backfire version of OpenWrt the Wifi module is automatically built in this platform, so we must clear it later from selection. DO NOT select “Default Profile (no WiFi)” here!
    Select “Network —>”
    Check “openflow” package (to built-in <*>)
    Check “tc” package (to built-in <*>)
    Uncheck “wpad-mini” package
    Exit
    Select “Kernel modules —>”
    Select “Network Support —>”
    Check “kmod-tun” package (to built-in <*>)
    Exit
    Select “Wireless Drivers”
    Uncheck “kmod-ath9k”
    Exit
    Exit
    Select “Utilites —>”
    Select “Editors —>”
    Check “nano” package (to built-in <*>)
    Exit
    Exit
    Exit
    A dialog asks you here “Do you wish to save your new OpenWrt configuration?”
    Select Yes and Press Enter

  25. Make the toolchain for the target
    $ make tools/install toolchain/install

    Note: If you have not cleaned tools than tools/install is not necessary.

  26. Configure the Linux kernel
    $ make kernel_menuconfig

    Select Networking Support
    Select Networking options
    Select QoS and/or fair queueing
    Check Hierarchical Token Bucket (HTB) (to built-in <*>)
    Exit
    Exit
    Exit
    Exit
    Select Yes and Press Enter

  27. Build the OpenWrt image
    $ make
  28. Get out from openwrt directory
    $ cd ..
  29. Copy the created general firmware to here
    $ cp openwrt/bin/ar71xx/openwrt-ar71xx-tl-wr1043nd-v1-squashfs-factory.bin .

    This will be the firmware for TP-Link TL-WR1043ND.

  30. You can safely remove the created directories:
    $ rm -rf ~/openwrt ~/openflow-openwrt

Congratulation! You have built the OpenFlow capable OpenWrt firmwares for these devices.

Jump to: Converting Asus WL-500g Deluxe and TP-Link TL-WR1043ND to OpenFlow switches (Part 2)

Bitmap manipulation programs

bitmapdd

This program creates a bitmap from a file (or device). It’s mainly used for creating a usage map of input but it can also do conversions.

You can download bitmapdd from GitHub:

$ git clone https://github.com/andmaj/bitmapdd.git

Scenario 1:

You have a file which consists of blocks of data. If a block is full of zeros than it’s free, otherwise it’s used. You want to make a bitmap from it where a bit in the file is 0 if the corresponding block is zero, otherwise it’s 1.

For example with block size set to 4:

$ bitmapdd --bs 4 --if input.dat --of output.dat

bitmapdd1

Scenerio 2:

Converting a text of zeros and ones to a binary file where every bit corresponds to one character in the original file.

$ bitmapdd --bs 1 --null 48 --if usagemap.txt --of usagemap.dat

Note: null byte has been set to 48 which is the code of character “0” in the ASCII character table. 

usagemap.txt contains text:
001100000100000001000001

usagemap.dat will contain text:
0@A

Character Decimal code Binary code
0 48 00110000
@ 64 01000000
A 65 01000001

bitmap2pbm

Creates a P4 type PBM image from a binary file. With this program you can visualize your binary (for example a usage map).

You can download bitmap2pbm from GitHub:

$ git clone https://github.com/andmaj/bitmap2pbm.git

How to use

For example creating an image of the first 10000 bytes of memtest binary:

$ head -c 10000 /boot/memtest86+-4.20 | bitmap2pbm --of memtest.pbm

You can view the image in Gimp.

bitmap2pbm


fat2bitmap

Creates a bitmap from FAT file system free/used clusters. The bitmap is in text format so contains zero (character 48) and one (character 49) bytes.

A zero means that the cluster is free, a one means that the cluster is used.

You can download fat2bitmap from GitHub:

$ git clone https://github.com/andmaj/fat2bitmap.git

How to use

Create a usage map of FAT file system (from filesys.iso image file)

$ fat2bitmap --if filesys.iso --of usagemap.txt

Convert the result to a binary image map with bitmapdd:

$ bitmapdd --bs 1 --null 48 --if usagemap.txt --of usagemap.dat

And finally display the usage map:

$ bitmap2pbm --if usagemap.dat --of usagemap.pbm
$ gimp usagemap.pbm &

You can also do these steps with one command:

$ fat2bitmap --if filesys.iso | bitmapdd --bs 1 --null 48 | bitmap2pbm --of usagem
ap.pbm

Note:
To create a FAT file system image file follow my guide:
http://fejlesztek.hu/create-a-fat-file-system-image-on-linux/

Create a FAT file system image on Linux

How to create the image file

[UPDATE: 2018.12.11.]
I’m sorry for the late correction, the approval request of comments landed in the SPAM. Stefan Naumann and Wojciech Franczyk pointed out correctly:

“Hi. In the point 3 you are creating FAT filesystem on the disk image, but you should have it created only on the partition. This is corrupting the image. You can check it trying fdisk -l test.img after performing the point 3 – you will get no partitions.

To fix it we first need to map the partition to /dev:
sudo losetup –offset 1048576 -f test.img
offset value is the start sector of the partition [2048] multiplied by sector size [512] to get bytes.

And create FAT filesystem on the partition, not disk:
sudo mkfs.vfat /dev/loop0

I’m leaving the solution here because I had exactly this problem as I needed valid whole disk image (to boot it), not only the partition 🙂
Nice tutorial thought, thanks for that, It helped me. Cheers.”

  1. Create a file filled with zeros:
    $ dd if=/dev/zero of=test.img count=50 bs=1M

    This command makes a 50 MB image file. Change the “count” argument for different size.

  2. Create the partition (and partition table):
    $ fdisk test.img
    
    Command (m for help): o
    Building a new DOS disklabel with disk identifier 0x46ac6035.
    
    Command (m for help): n
    Partition type:
      p primary (0 primary, 0 extended, 4 free)
      e extended
    Select (default p): <Enter>
    Using default response p
    Partition number (1-4, default 1): <Enter>
    First sector (2048-99999, default 2048):
    Using default value 2048
    Last sector, +sectors or +size{K,M,G} (2048-99999, default 99999): <Enter>
    Using default value 99999
    Partition 1 of type Linux and of size 47.8 MiB is set
    
    Command (m for help): t
    Selected partition 1
    Hex code (type L to list all codes): c
    
    Changed type of partition 'Linux' to 'W95 FAT32 (LBA)'
    
    Command (m for help): w
    The partition table has been altered!
    
    Syncing disks
  3. Create the FAT file system in the image
    $ mkfs.vfat test.img 
    mkfs.fat 3.0.22 (2013-07-19)

 How to mount the image and copy files

  1. Create a directory for mounting
    $ sudo mkdir /mnt/test
  2. Mount the image
    $ sudo mount test.img /mnt/test

    Now you can copy/delete files in /mnt/test directory which will be written into the image file.

  3. After file operations unmount the image
    $ sudo umount /mnt/test
  4. Delete the directory
    $ sudo rmdir /mnt/test

Restoring factory firmware on TP-Link TL-WR1043ND

If you have installed OpenWrt Backfire on your TP-Link TL-WR1043ND and want to restore the factory firmware than this guide is for you.

Device: TP-Link TL-WR1043ND Ver: 1.6
FCC ID: TE7WR1043NX
CPU: Atheros AR9132
RAM: 32 MB
Flash: 8 MB
Network: 4 + 1 ports (10/100/1000 Mb/s)
IP address: 192.168.1.2

Software on router before

OpenWrt Backfire
Version: 10.03.1 (r33081)

Software on router after

TL-WR1043ND_v1_130428
Version: 3.13.13 Build 130428 Rel.58290n

Host operation system is Fedora 19 (64 bit).
If you are not using Fedora 19, you should virtualize it:
Installing Fedora 19 (64 bit) in VirtualBox

I presume that you can communicate with your router.

Preparations

  1. Go to TP-Link Support site: http://www.tp-link.com/en/support/download/
    Click “TL- WR1043ND” (it’s in the 300Mbps Wireless N group)
    tplink_support
  2. Read the warning message and click “If you have read the above notice, please click here to find hardware version.
  3. My router is V1 because “Model: TL-WR1043ND Ver: 1.6” written on its back
    Click “TL-WR1043ND V1
    version_select
  4. Download the firmware by clicking “TL-WR1043ND_v1_130428
    Warning: Do NOT download an other firmware version because in case of TP-Link there may be different steps to take.
    If it doesn’t work here is a copy of it one my site: TL-WR1043ND_v1_130428.zip
    correct_firmware
  5. Decompress the firmware
     $ unzip TL-WR1043ND_v1_130428.zip
  6. Check firmware checksum
     $ sha1sum wr1043nv1_en_3_13_13_up_boot\(130428\).bin

    It should return:
    25c3c2bd86dba8bd4c68489489e28e580560bf6c wr1043nv1_en_3_13_13_up_boot(130428).bin

  7. This firmware version also contains the boot code so we have to strip it first
     $ dd if=wr1043nv1_en_3_13_13_up_boot\(130428\).bin of=wr1043nd_v1_correct.bin skip=257 bs=512
  8. Check the corrected firmware checksum
     $ sha1sum wr1043nd_v1_correct.bin

    It should return:
    6899d121113c92d93a20ae7b308bc06a3295aba0  wr1043nd_v1_correct.bin

Firmware update

  1. Copy this file in the router
     $ scp wr1043nd_v1_correct.bin root@192.168.1.2:/tmp/

    Note: My router IP address is 192.168.1.2, change it to your router IP address in all commands

  2. Login to your router
     $ ssh root@192.168.1.2

    Enter your password.

  3. Write the firmware to flash
    root@OpenWrt:~# mtd -r write /tmp/wr1043nd_v1_correct.bin firmware

    mtd

  4. Wait until “Rebooting …” appears
    Note: If you have configured your router as an OpenFlow switch before using my guide than you have to pull out the LAN cable from WAN port now and plug into a LAN port (eg. LAN1).
  5. Go to http://192.168.1.1 in your browser
    user: admin
    password: admin

    Press Enter

    login_page

Congratulation! You have just restored the original firmware.